Every summer, Winnipeg homeowners experience skyrocketing energy bills as hot air infiltrates homes and cool air slips away. These energy leaks, usually caused from inadequate insulation, hidden air leaks, or unseen water leaks, quietly drain cool air and comfort. Recognizing and addressing these issues is essential for energy efficiency, reduced air conditioning costs, and improved indoor comfort.
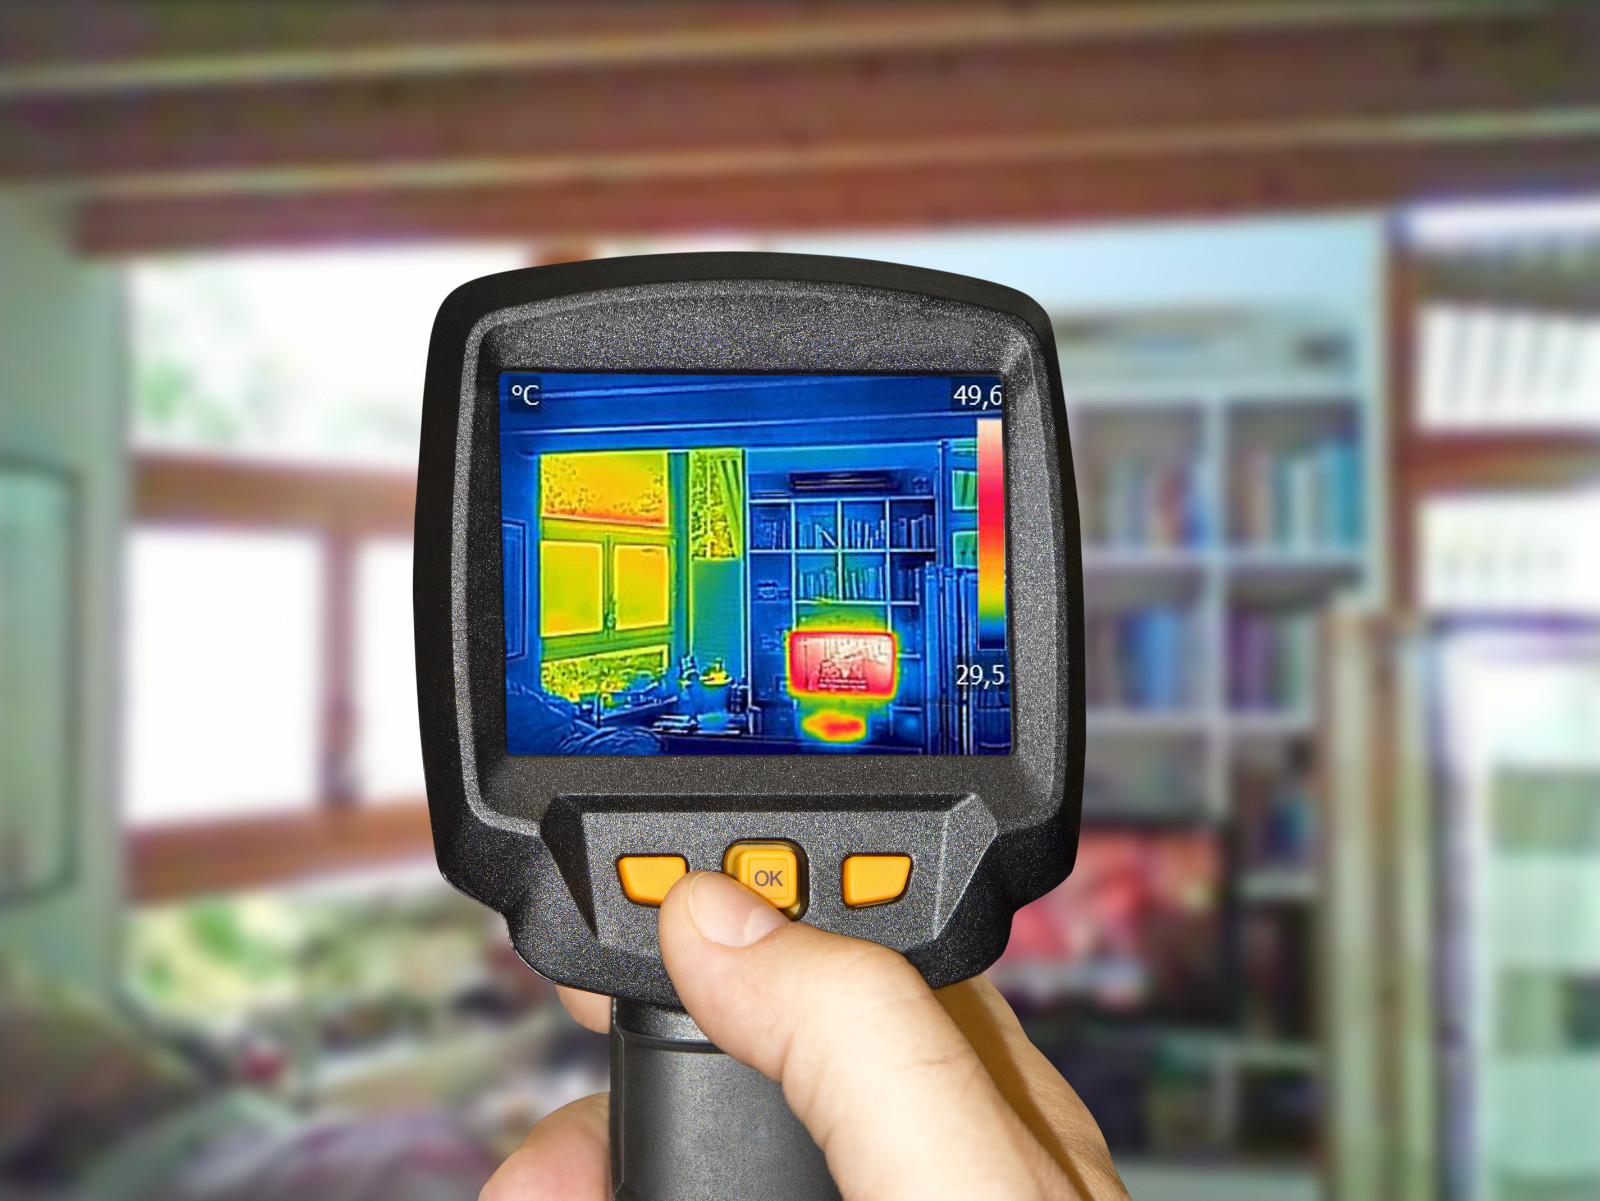
That’s where thermal imaging—also known as infrared thermography—comes in. Using a thermal camera, this technique uses infrared cameras to visualize temperature differences, making the otherwise invisible world of cool energy or heat energy visible. By identifying hot and cold spots, insulation gaps, or air flow issues, homeowners can target problems precisely and efficiently.
For Manitoban families, with our long, hot summers, detecting and sealing cool air loss early means staying cool and keeping money in your pocket. Investing in energy-efficient solutions not only boosts your comfort but also supports sustainable living. What is a key component to staying comfortable this summer? Detect air leaks early!
How Thermal Imaging Works
Thermal imaging involves capturing infrared light emitted by objects and converting it into a visual map of temperature variations. Simply put, every surface emits infrared radiation—and the hotter it is, the more intense the emission. A good thermal camera creates a real-time heat map, highlighting warm and cold areas.
These devices generate 2D thermograms, revealing areas where cool air escapes or hot drafts enter. Put an infrared camera on a poorly insulated wall, and you’ll see bright (hot) spots in winter or dark (cold) spots in summer—visual proof of heat loss. According to energy.gov, a temperature difference of at least 14 °C (20 °F) between interior and exterior makes leaks much easier to spot.
Using handheld thermal cameras, professionals conduct scans that can capture temperature variations inside and outside, identifying areas such as uninsulated attic doors, exterior wall electrical outlets, recessed lighting, and even moisture detection—identifying invisible energy inefficiencies that standard inspections miss.
Common Home Energy Leak Sources
Thermal imaging consistently reveals several recurrent culprits:
- Poor insulation – Compression, missing batts, or misaligned insulation in walls, ceilings, and floors. Even insulated attic door covers may have gaps, exposing conditioned air to the cold attic.
- Air leakage – Cracks and gaps around exterior doors, windows, duct penetrations, plumbing fixtures and recessed lighting allow cold air infiltration, reducing indoor comfort.
- HVAC ductwork – Leaky or disconnected ducts can squander heated or cooled air, forcing your air conditioning or heating system to work harder and increasing energy consumption.
- Moisture intrusion & water leaks – Wet insulation cools down faster than dry areas. Thermal imaging can detect moisture well before visible damage appears—helping prevent mould and structural decay.
- Electrical hotspots – Overloaded circuits or faulty connections can appear as anomalously warm areas; thermal imaging can flag these as part of a home energy audit or safety check.
Spotting these issues early means targeting repairs and improvements effectively—and avoiding the guesswork and disruption of ineffective and destructive testing.
Benefits of Thermal Imaging
Non-invasive diagnostics: No need to rip open walls—infrared cameras scan freely, sparing your home from unnecessary damage.
Speed and precision: A comprehensive scan of your home’s envelope—attic, walls, windows, duct lines, piping—can take just a couple of hours, which is much faster than manual inspection.
Visual evidence: Thermograms are compelling proof. They help homeowners understand the problem and build trust in the recommendations provided.
Cost-effective: By pinpointing exact problem areas, thermal imaging helps reduce energy waste, lower heating bills, and improve comfort long-term.
Early detection: Spot moisture issues, detect leaks and premature electrical faults before they escalate into costly repairs or hazards.
When & How to Perform a Thermal Scan
To get the most accurate thermal results:
Timing – The best time to conduct a thermal scan is during extreme temperature differences between indoors and outdoors. Winter is ideal, when cold outdoor air contrasts with a heated interior. However, summer can also work well—especially during hot spells—when your cool, air-conditioned interior sharply contrasts with the outdoor heat. In both cases, the strong temperature difference makes invisible leaks and insulation gaps stand out clearly.
Scan process:
- Start indoors—scan attic doors, insulation gaps, recessed lighting, wall penetrations.
- Move outdoors—inspect exterior walls, windows, and exterior outlets.
- In attics and crawl spaces, look for hidden leaks around wiring, pipes, and ceiling fixtures.
- Use supplemental tests: a blower-door test can quantify air leakage, while a moisture meter confirms damp areas.
Preparation tips:
- Clear furniture from walls to expose hot or cold-air infiltration zones.
- Turn off HVAC systems to stabilize temperature differences.
- Maintain a consistent interior temperature (around 20°C/68°F) if possible.
- Temporarily block air flow during inspections for clarity.
Tools & Equipment
Professional-grade thermal imaging gear varies widely—from entry-level handheld thermal cameras to high-resolution, ruggedized infrared cameras with MSX overlays. These high-end units not only detect subtle temperature differences but also integrate with software suites to produce annotated reports. Accessories like moisture meters and blower-door systems complete the toolkit for a thorough home energy audit. Specialist tools and trained professionals provide comprehensive insight and reliable results that most homeowners do not have access to or have the experience to identify common problem areas.
DIY vs. Professional Inspections
Handy homeowners can indeed try consumer-level thermal cams. But:
- DIY thermal imaging camera units often lack the resolution and accuracy of professional-grade equipment.
- Without training, misinterpretation or missed issues is common—leading to incomplete or unnecessary fixes.
In contrast, certified professionals bring:
- High-end tools and training.
- A full home evaluation—covering thermal, airflow, moisture, and electrical.
- A clear action plan for insulation, air sealing, and energy improvements.
While DIY is possible, professional inspections offer deeper insights, actionable outcomes, and peace of mind.
Case Study Examples
While we don’t have our own case studies, here are real-life scenarios drawn from other sources:
- Missing wall insulation: Thermography revealed cool bands along exterior walls. Once filled, homeowners reported noticeable comfort improvement and a 15% reduction in heating costs.
- Leaky duct joints: A poorly sealed duct in the basement leaked warm air into the crawl space. Upon sealing the leak, heating efficiency improved and system cycling slowed.
- Water ingress detection: A cooler patch was spotted in the attic above an exterior wall. Moisture was confirmed and repaired before mold took hold.
These examples emphasize improved energy conservation, increased comfort, and reduced heating bills—all thanks to targeted interventions guided by thermal evidence.
Why Choose Above All Insulation
When it comes to detecting energy loss and improving home efficiency, experience and equipment matter. At Above All Insulation, we specialize in professional thermal imaging and insulation services tailored to Winnipeg’s unique climate challenges. Our team uses advanced infrared technology to identify hidden energy leaks, moisture issues, and ventilation problems—ensuring you get the most accurate and actionable results:
- Comprehensive, start-to-finish service: From detailed thermal scans and energy assessments to insulation upgrades and final post-work imaging.
- Certified, experienced technicians: All inspections are carried out by certified, highly trained technicians using professional-grade thermal cameras.
- Peace of mind: Best of all, we provide clear visual evidence of the issues we detect—and proof of the improvements we’ve made—so you can feel confident that your home is sealed, protected, and running efficiently.
You’re not just getting a service when you choose Above All Insulation—you’re getting transparency and accountability, backed by technology and expertise.
Conclusion
Using thermal imaging to detect home energy leaks is one of the smartest, most cost-effective steps homeowners can take to protect their homes and wallets. Unlike guesswork or traditional inspections, thermal imaging offers a detailed, visual snapshot of how heat moves through your home—highlighting exactly where you’re losing warmth in winter or letting in unwanted heat in summer. From insulation gaps and air leakage to hidden moisture problems and electrical faults, thermal cameras help uncover what’s really going on behind your walls, ceilings, and floors. This powerful tool brings an otherwise invisible world into clear view, allowing homeowners to make targeted improvements that truly work.
What makes this approach so valuable is that it supports energy efficiency all year long. During colder months, it identifies where heat loss occurs; in warmer seasons, it highlights how cold air escapes, overworking your air conditioning and raising utility bills. Thermal imaging helps ensure your home remains comfortable and energy-efficient in every season. When combined with professional insulation and air sealing, it can lead to substantial cost savings, improved indoor air quality, and long-term protection against structural damage from leaks. For homeowners in Winnipeg and beyond, investing in a thermal scan is not just a smart move—it’s a long-lasting investment in a more energy-conscious, comfortable, and affordable home.
Ready to take the next step? Book a thermal imaging scan with Above All Insulation. Our professional team will conduct a thorough thermal audit, supply documented results and recommend the most trusted solutions to seal up your home.
Frequently Asked Questions
Is DIY thermal imaging reliable?
Basic scans and inexpensive equipment can pick up obvious leaks. But without the right gear, a thermal camera and experience detecting air leaks, hidden issues often go unresolved. For a thorough, dependable home energy audit, professionals who use a thermal camera to detect air leaks are the smart choice.
How long does an inspection take?
Most homes can be fully scanned with a thermal imaging camera—interior, exterior, attic, ductwork—in just 2–3 hours. Adding blower-door and moisture testing may extend this by another hour.
Can imaging spot water leaks or electrical faults?
Absolutely. Thermal scans can reveal damp areas (which appear cooler) and electrical hotspots—preventing damage before it becomes serious.
Are there rebates or incentives in Winnipeg?
Yes! Manitoba utilities and programs like Efficiency MB offer rebates for energy-efficient upgrades, including insulation and air sealing. Our team will assist you in finding and applying for available incentives.